The software of the fork-o-drumbot is simple, but it uses a number of tricks that I would like to show you here.
The concept is very straightforward:
- the MIDI source sends to the Arduino the note of the percussion to be played;
- the software recognizes the note and sends a PWM signal to the related solenoid, proportional to the intensity of the note.
Seems easy, doesn’t it? But often simple things hide something complex. Let’s go in depth!
The source code
Everything is based on the Arduino MIDI library v3.2, which is great and extensively documented. No headache here. Remember to set the library to the serial port you want to use. If you use my diagram that’s Serial1,
MIDI is made for melodies (notes are not percussions)
How do we encode drum patterns on a music score?
We use the General Midi standard drum map! Every note defines a percussion. We have only some of them in the Fork-o-Drumbot, so I have mapped only the following:
36 = C2 = Kick drum 1
38 = D2 = Acoustic snare
42 = F#2 = Close Hi-Hat
44 = G#2 = Pedal Hi-Hat
46 = A#2 = Open Hi-hat
That means that the Fork-o-Drumbot is only able to play those notes. Usually I edit a little the midi tracks in order to make them playable. See here below the complete GM MIDI drum mapping.

By Rodrigocd (Own work) [GFDL (http://www.gnu.org/copyleft/fdl.html), CC-BY-SA-3.0 (http://creativecommons.org/licenses/by-sa/3.0/) or CC-BY-SA-2.5-2.0-1.0 (http://creativecommons.org/licenses/by-sa/2.5-2.0-1.0)], via Wikimedia Commons
Measure the performances
There are two things we have to take into account:
- The sticks will take some time to travel from the rest position to the hit point. This is specially valid for the kick and the snare sticks, which are thick and heavy and with lots of momentum;
- The PWM output of the Arduino has 255 levels, but we cannot use the entire range 0-255. This is because the lowest numbers would not provide enough current to the solenoids to make them move.
How to measure all of this? Like follows!
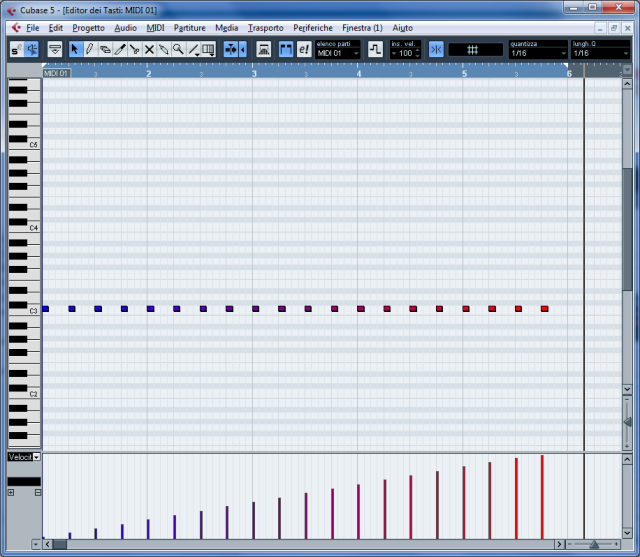

I have generated a sequence of MIDI notes of increasing intensity for every percussion to be measured. I covered the complete velocity span 0-127. I played the sequence and noted down what was the minimum value of velocity that gave a decent sound.
At the same time I have recorded the sound with a microphone and I have measured the time interval between the start of the MIDI note and the hit point in the recording. This was possible because I have a low-latency audio card, and the drivers are able to compensate the residual latency.
MIDI is made for melodies (percussions have no duration)
The basic information contained in the MIDI message is: noteOn, velocity, and noteOff. If you want to play almost any other instrument you need to know when the note starts and when the note stops. In case of percussions the noteOff is completely irrelevant. We discard this information, because we want to release the solenoid as soon as possible to make it ready for the next stroke.
To achieve this, every time a solenoid is triggered I store the millis() value in the variables hittime1…4. Then I release the solenoids when the millis() value is greater or equal to hittime1..4 + MAX1…4. The variables MAX1…4 are the travel times of the sticks in milliseconds. Exactly what I have measured above!
The travel times are between 40 ms (the hi-hat stick) and 80 ms (the kick drum). That means that the kick drum is theoretically able to play continuously a 1/16th notes fill at 46 bpm. In reality, we have also to consider the travel back of the stick, so it’s even lower. It’s not a great speed, the mechanics it’s heavy, but it’s still enough if you don’t want to play speed metal with double kick drum. For instance, I could make it faster by shortening the travel distances of the sticks. The drawback is less power of the sound. The hi-hat is twice as fast instead, because it’s much lighter.
From velocity value to PWM
Midi notes carries the velocity signal, which is a number 0..127 that represents the intensity of the note to be played. The PWM of the Arduino has 255 levels. In order to provide dynamics to the drumbot, the software “compresses” the values 0..127 in a x..255 range, where x is the minimum PWM value that gives a sound, as measured above. This values are stored in the variabels MIN1..4. The software calculates the values as follows:


The hi-hat code
Another problem to solve is that the GM MIDI mapping gives us three notes:
note 42 = F#2 = Close Hi-Hat
note 44 = G#2 = Pedal Hi-Hat
note 46 = A#2 = Open Hi-hat
but we only have two solenoids. Notes 42 and 44 are respectively the sound of hitting the closed and opened hi-hat, while note 44 is the sound of the hi-hat when it’s closed with the pedal. Opening and closing the hi-hat introduces additional sounds that may disrupt the rhythm of the song. What to do?
This is the strategy: the hi-hat is always left in the last position. If a “open” note is played, the hi-hat will not be closed until a “close” note is played, or a “pedal” note is played. This give to the hi-hat a really realistic sound. I have tried with reggeae tracks and it rocks! (Or it reggaes!) The note 44 will only open and close quickly the pedal. You can have an idea of the effect by checking the video you find at the bottom of my post about the mechanics.
And now… the code!
Here it is! Feel free to use/modify/distriubute/comment!
#include <MIDI.h>

#define OUT1 3 //kick drum
#define OUT2 5 //snare drum
#define OUT3 6 // open hi-hat
#define OUT4 9 // hit hi-hat

#define MAX1 80 //time in millisecond before releasing the kick drum
#define MIN1 54 //minimum velocity that produces an output. Dynamic range will be compressed between XX-127

#define MAX2 70 //time in millisecond before releasing the snare drum
#define MIN2 57 //minimum velocity that produces an output. Dynamic range will be compressed between XX-127

#define MAX3 90 //time in millisecond before releasing the hi-hat pedal (used only for note 44)
#define MIN3 97 //minimum velocity that produces an output. Dynamic range will be compressed between XX-127

#define MAX4 40 //time in millisecond before releasing the hi-hat stick
#define MIN4 105 //minimum velocity that produces an output. Dynamic range will be compressed between XX-127

long int hittime1; //millis() value when receiving the note of the kick drum
byte range1; //stores the dynamic range of the kick drum (MAX - MIN pwm values that produces sound)

long int hittime2;
byte range2;

long int hittime3;
byte range3; //range used only for note 44

long int hittime4;
byte range4;

byte pwm; //calculation of the pwm value to be output
float calc; //used for calculation of pwm value
boolean hihatpedal = false; //true if hi-hat was opened by note 44

// void HandleNoteOff(byte channel, byte pitch, byte velocity) {
// Note off is currently not handled since the solenoids are released with a timeout
// }

// This function will be automatically calOUT when a NoteOn is received.
// It must be a void-returning function with the correct parameters,
// see documentation here:
// http://arduinomidilib.sourceforge.net/class_m_i_d_i___class.html

void HandleNoteOn(byte channel, byte pitch, byte velocity) {
 // Triggers related solenoid when receives a Note On.
 // General Midi drumset mapping used:
 // 36 = C2 = Kick drum 1
 // 38 = D2 = Acoustic snare
 // 42 = F#2 = Close Hi-Hat
 // 44 = G#2 = Pedal Hi-Hat
 // 46 = A#2 = Open Hi-hat

switch (pitch){
case 36: //Kick drum
 calc = (float)velocity / 127 * (float)range1; //calculates the PWM output to be used. The PWM value 0-255 is proportionally
 pwm = (byte)calc + 2* MIN1; //scaled to the midi note velocity 0-127. Note velocity = 1 will set PWM=MIN1
 analogWrite(OUT1, pwm); // Note velocity = 127 will set PWM = 255
 hittime1 = millis();
 break;

case 38: //Snare drum
 calc = (float)velocity / 127 * (float)range2;
 pwm = (byte)calc + 2* MIN2;
 analogWrite(OUT2, pwm);
 hittime2 = millis();
 break;

//Hi-Hat will be opened and left open when a "Open Hi-Hat" note is received. It will be closed as soon as a new "Close Hi-Hat" or "Pedal Hi-Hat" note is received.

case 42: //Close Hi-Hat
 calc = (float)velocity / 127 * (float)range4;
 pwm = (byte)calc + 2* MIN4;
 analogWrite(OUT3, 0); //if Hi-Hat was open, close it
 analogWrite(OUT4, pwm);
 hittime4 = millis();
 break;

case 46: //Open Hi-Hat
 calc = (float)velocity / 127 * (float)range4;
 pwm = (byte)calc + 2* MIN4;
 analogWrite(OUT3, 255); //if Hi-Hat was close, open it
 analogWrite(OUT4, pwm);
 hittime4 = millis();
 break;

case 44: //pedal
 calc = (float)velocity / 127 * (float)range3;
 pwm = (byte)calc + 2* MIN3;
 analogWrite(OUT3, pwm);
 hittime3 = millis();
 hihatpedal = true;
 break;

}
 // Try to keep your callbacks short (no delays ect) as the contrary would slow down the loop()
 // and have a bad impact on real-time performance.
}

void setup() {
 // Initiate MIDI communications, listen to all channels
MIDI.begin(MIDI_CHANNEL_OMNI);
pinMode(OUT1, OUTPUT);
pinMode(OUT2, OUTPUT);
pinMode(OUT3, OUTPUT);
pinMode(OUT4, OUTPUT);

range1 = 255 -MIN1 *2;
range2 = 255- MIN2 *2;
range3 = 255- MIN3 *2;
range4 = 255- MIN4 *2;

// Serial.begin(9600); //used sometimes for debugging

 // Connect the HandleNoteOn function to the library, so it is calOUT upon reception of a NoteOn.
 MIDI.setHandleNoteOn(HandleNoteOn); // Put only the name of the function
// MIDI.setHandleNoteOff(HandleNoteOff);

}
void loop() {
 // Call MIDI.read the fastest you can for real-time performance.
 MIDI.read();

 // reset the coils after related timeouts
 if (millis() >= (hittime1 + MAX1)) {
 analogWrite(OUT1, 0);
 }
 if (millis() >= (hittime2 + MAX2)) {
 analogWrite(OUT2, 0);
 }
 if (hihatpedal && millis() >= (hittime3 + MAX3)) { //close pedal by timeout only if it was triggered by note 44
 analogWrite(OUT3, 0);
 hihatpedal = false;
 }
 if (millis() >= (hittime4 + MAX4)) {
 analogWrite(OUT4, 0);
 }
}

just add this after include midi lib ; “MIDI_CREATE_DEFAULT_INSTANCE();”
ty
Hi! What’s the use of that? For me it’s working as you see it in the post (I’ve tried just copying and pasting in the sketch).
Isn’t it working for you without that?
with the most recent midi library is not working without